
Before connecting on a Sessionwire call, be sure to test your devices to ensure you're sending audio properly.
In order to start a Sessionwire call or send your Studio's Invite URL, you'll need to have an active Sessionwire subscription.
After logging in to your Sessionwire account, follow these steps to test your devices:
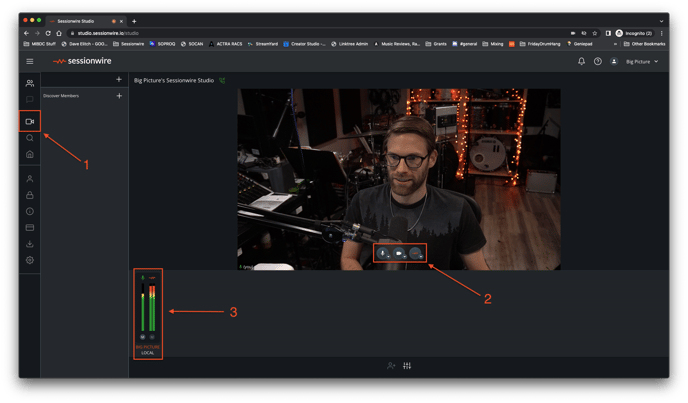
- Navigate to the Studio tab in the left hand menu
- Set your Talkback, Camera and HQ Audio settings appropriately
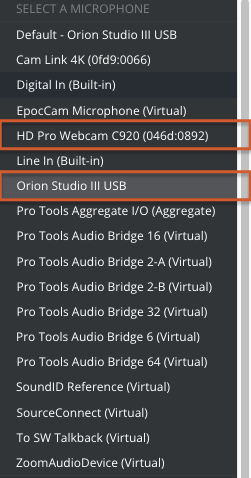
- Set up the Talkback Audio stream. Clicking the drop down arrow beside the Microphone button will present a menu with two halves. The top half is where you will select your Microphone - select a device that you know you can use to get your voice into the Sessionwire call. Most often a USB webcam microphone or an audio interface with a microphone plugged into channel 1 or 2 will work. (See image below - either a USB webcam or an audio interface with a microphone plugged into channel 1 or 2 can be selected as the Talkback Microphone)
The bottom half is where you will select your Speaker - select a device that you know you can hear audio from. Most often this will be set to the built in output device or an audio interface. (See image below - an audio interface is selected as the Talkback Speaker)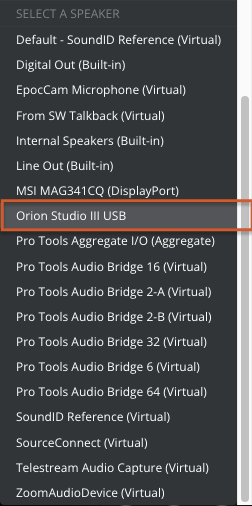
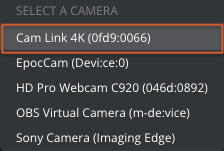
- Set up the Video stream. Click the dropdown arrow beside the Camera icon. Select a camera or virtual camera device from the list. Most often this will be a USB camera, however virtual cameras like OBS Virtual Camera or EpocCam can be used. (See image below - a Cam Link 4K USB capture card is selected as the Camera)
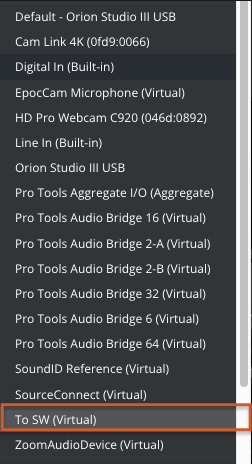
- Set up the High Quality Audio stream. Clicking the drop down arrow beside the Sessionwire logo button will present a menu with two halves. The top half is where you will select the HQ Audio Source - where the High Quality Audio will be originating on your machine. Most often a the HQ Audio Source will be set to Sessionwire Send Plugin. This plugin will be inserted in a DAW and is the bridge between the DAW and Sessionwire (See image below - the Sessionwire Send Plugin is selected - in this case it is labelled "ToSW (Virtual)")
The bottom half is where you will select your HQ Audio Destination - where you would like the High Quality Audio from the Sessionwire call to end up on your local machine. Most often this will be set to the built in output device or an audio interface. (See image below - an audio interface is selected as the HQ Audio Destination)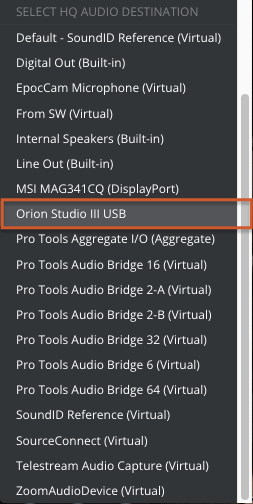
- Set up the Talkback Audio stream. Clicking the drop down arrow beside the Microphone button will present a menu with two halves. The top half is where you will select your Microphone - select a device that you know you can use to get your voice into the Sessionwire call. Most often a USB webcam microphone or an audio interface with a microphone plugged into channel 1 or 2 will work. (See image below - either a USB webcam or an audio interface with a microphone plugged into channel 1 or 2 can be selected as the Talkback Microphone)
- Once appropriate settings have been selected, test the Talkback Audio stream by speaking into your talkback microphone - the mono meter shown in the image at the top of this page.
Then test the HQ Audio stream by inserting the Sessionwire Send plugin at the end of the Master Fader or Stereo out FX chain in your DAW and press play - signal should show in the stereo meter shown in the image at the top of this page.
You're all set! Now send your Invite URL to a collaborator or call a Connection from your Connections list!